Christmas is fast approaching and no matter how old you get, at Christmas time you are always a kid at heart! Keep your middle school kids fascinated by the wonderment of STEM by doing a few of these projects throughout the month. They combine science, technology, engineering, and math to form some pretty cool results!
Simple Science with Snow
Soon the snow should be falling and that will be the perfect time to do this cool science experiment! First up, you’re going to need 3 mason jars. Fill one with ice cubes (not crushed ice), pack one with snow, and fill one about half way with tap water. Next, put the lids on tight and leave the jars on the counter.
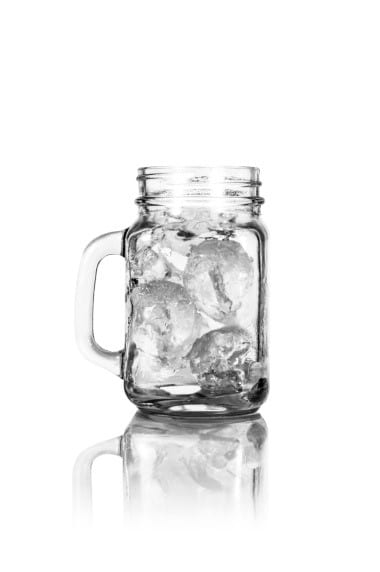 Ask your child what they think the control is in this experiment. The correct answer is the water because eventually, all of the jars will be filled with water. Next, ask why they think the lids are needed. They might say that they prevent evaporation and that is correct! It helps keep all the water inside the jars and prevents it from evaporating into the air.
Ask your children at the beginning of the experiment which jar would end up with the most water. Also ask them which do they think will melt faster, the snow or the ice. These are their hypothesizes. If they are making a quick guess, they might assume that the jar packed with snow might have the most water after it melts. Let them wait and see what happens!
Changes will start happening quickly, so encourage your child to make observations. They could document what they are observing in a science journal. Times should be noted along with their observations so they see how quickly (or slowly) changes are occurring. They’ll start to notice that the snow actually melts a lot faster than the ice cubes; however, very little water is left over once the snow melted.
 The ice could take up to a few hours to melt completely but when it’s done melting, how much water were they left with? The results usually surprise those making the observations. They are left wondering how did the ice cubes, which had a lot of air surrounding them in the jar, melt and give a higher volume of water than the snow? It’s all about the structure of the molecules!
Water molecules take on different structures depending on the state they are in. When water is frozen, it is in its solid state (ice). The molecules are tightly stacked together. If you take a look at the molecules of snow, their molecules fuse together into a crystallized form, giving us the amazing crystal patterns that come to mind when we think of a snowflake.
With this in mind, explain that even though the snow was hard packed into the mason jar, the molecules are still not as tightly fused as they are in the ice cubes. That’s why when the ice and snow melted, the ice yielded more water.
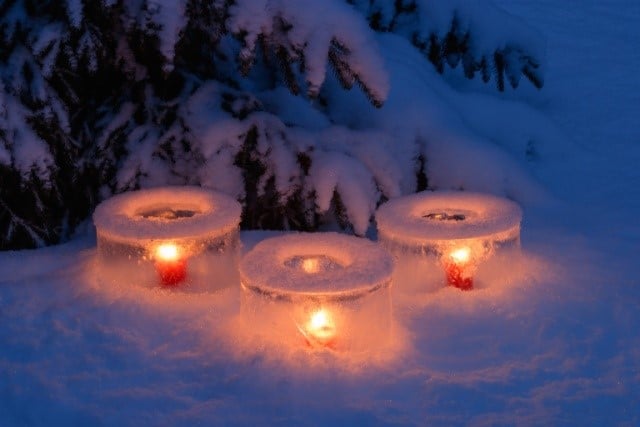
Crafting an Ice Lantern
This is a wonderful, easy outdoor decoration to make that will wow your friends and family every time they come over!
To get started, you will need the following supplies:
- Large plastic Solo cup
- Small plastic Solo cup
- Food coloring
- Tape
- Water
- Room in your freezer (or the outside temp must be below 32 degrees Fahrenheit)
- Candle, battery operated only
- Decorative items (beads, pipe cleaners, pompoms, tinsel, tiny bells, etc.)
To give you a quick synopsis of how this project works, you will add your decorations to the large cup, and then insert the small cup into the larger cup. You will then be adding water to the large cup, allowing it to freeze afterwards. The end result will be your ice lantern.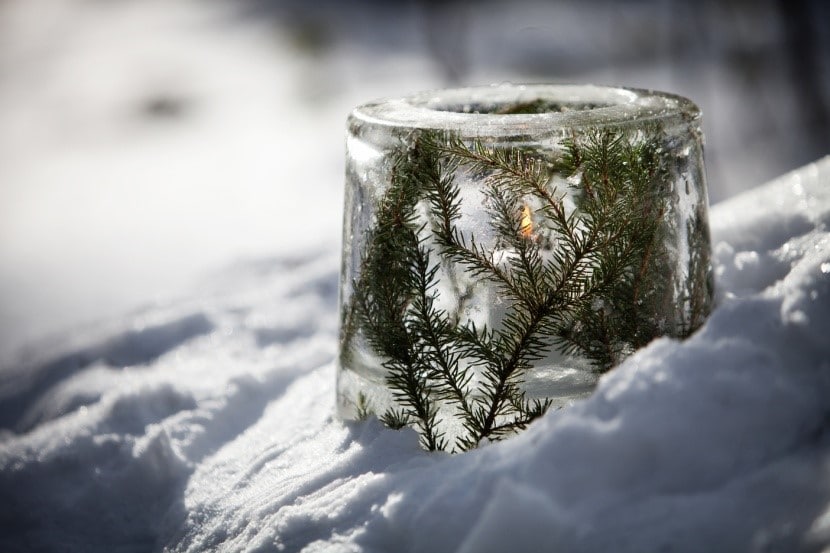
So, to first get started, have you child think carefully about how they will use their decorations. If you drop your beads, pompoms, and other tiny decorations inside the cup, they will just fall to the bottom. Have them think how they could use all of the decorative items to decorate the entire lantern, not just the bottom. Here’s a hint: they could spiral the pipe cleaners up the side of the cup. The will look like garland in your final lantern and will help to hold the other items in place as they are put in. Let your child know that no matter how carefully they lay out their decorations, they will move some when the water is poured in, and that’s OK.
After the larger cup has been decorated, slip the small cup inside of it. Now you will need to tape the smaller cup in place, so that both cups are level with each other.
It’s time to add the water! Carefully pour water into the larger cup. As you do this, you will notice that the little cup wants to rise. Adding a bit of weight to the small cup will help with that and will keep the cup securely in its place. You can add little stones or rice as easy weights. Fill the larger cup with water until it is about ¾” away from the top of the glass. You can add a few drops of food coloring to the water if you’d like.
 Place the cup in the freezer for several hours until it is frozen solid. Once it’s frozen, have your student look carefully and observe what happened. Even though the smaller cup was weighed down, it has now risen above the larger cup and the water has frozen to the top of the large cup. Explain that this is because the water molecules get tightly packed as the water freezes and it expands in size.
The next step is to carefully remove the cups, starting with the small cup. If the cup doesn’t easily remove, you may need to cut it and remove it in strips. Place your beautiful lantern creation outside for everyone to enjoy! Insert a battery operated candle and it will look beautiful (and since its battery operated, it won’t melt your lantern!).
Do you do any fun experiments with your 5-12th grader during the winter months? Let us know! Head over to our Facebook page and share your experiments with the My Virtual Academy community! If you have any other questions, feel free to call us at 800-297-2119.